SQL Server Authentication and Authorization on Azure with Managed Identities
Deploying infrastructure to Azure is easy enough these days with Azure Powershell, CLI or Bicep. Making interactions between infrastructure components secure is also facilitated in Azure with Managed Identities for example. Databases however, often have their own authentication and authorization internally which is out of reach for Bicep and ARM templates. How can you secure your dynamically created SQL Server databases in Azure?
Context
For this post we need to place ourselves in a context where there is a database and some (web) application involved that need to communicate with each other in a secure way. Because Managed Identities is a promoted solution within Azure for secure interaction for all kinds of Azure products, we want to use that as well. We’d rather not have separate credentials for just the database connection. Connection Strings with secrets in them are also out of the question, because our imaginary company states that that is not compliant.
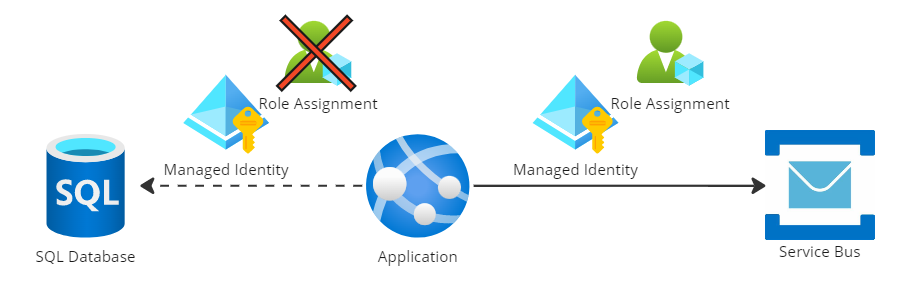
In this scenario we’ve already set up a connection with a Service Bus that uses a managed identity + a role assignment to exclusively give access to the app service. Now we want to do something similar for the SQL Server connection.
As mentioned in the introduction, SQL Server doesn’t have Role Assignment functionality to give access to a specific database, let alone limit the actions the connection may perform on the database. Users and authorizations are configured in the Security section of the database. Our goal is to add our Managed Identity as a user and provide it with the db_owner role.
Register users in SQL Server
A Managed Identity source of truth is within Azure AD. If we want to add a Managed Identity as a user to a SQL database we are not making a copy, we are just making a reference where the incoming identity can be looked up.
To add users to a database, we have to perform a SQL command in the database itself. There is simply no other way. This will cause a classic Chicken and Egg problem. When a database is created it’s completely empty including the registered users. So who is allowed to add the first user when no one is allowed access? When the SQL Server itself is configured, an administrator has to be appointed to perform the initial actions. This can be a basic username and password combination, or an existing Azure AD user can be assigned as administrator. This will be our entry point to configure the application-level authorizations.
A SQL Command can be executed through multiple routes. But we don’t want to give this responsibility to a human. Everything should be automated by design. During my own implementation I’ve noticed that there are two types of commands that can be executed that will have the same end result.
Option 1: From external
This approach is the smoothest looking way of adding a user that originates from Azure AD:
CREATE USER [NameOfManagedIdentity] FROM EXTERNAL PROVIDER;
What happens under the hood is that basically we’re saying to SQL Server “Here is a name of a managed identity, it originates from in an external provider (read, Azure AD). Go look it up and store the details internally.”
There are a few prerequisites to get this working though:
- The SQL Command itself has to be performed under a session of an identity in Azure AD
- The identity performing the query needs to have the ‘Azure Active Directory Graph > Directory.ReadAll’ permission
Unfortunately, I didn’t get this implementation working properly myself at first. Although I executed the command under an identity registered in Azure AD, with the required permissions and even more as described in Microsoft’s own documentation. It didn’t have enough permission to lookup the details of the Managed Identity during the execution of the command. It kept failing with the same error message.
After a while I discovered that it doesn’t matter what privileges the identity has that executes the SQL command, the identity of the SQL Server itself has to be granted Directory Reader access in order to lookup the AD user and register it within SQL Server.
Option 2: Calculating the SID
Because option 1 didn’t work for me at first, luckily there was an alternative way to register the Managed Identity in a SQL database.
CREATE USER [$managedIdentityName] WITH DEFAULT_SCHEMA=[dbo], SID = $sid, TYPE = E;
The AD lookup is needed to retrieve a unique identifier to store with the new SQL User — this is called a SID. When later authentication attempts take place, the identity can be verified. This identifier can be calculated locally without the need of an Azure AD within SQL Server. This way, there is no need for a runtime lookup during the registration, yet the managed identity of the application will still be recognized and allowed access.
In the example below a complete PowerShell script is shown to calculate the SID and execute the SQL Query:
param (
  [Parameter(Mandatory)][ValidateNotNullOrEmpty()][string]$managedIdentityName,
  [Parameter(Mandatory)][ValidateNotNullOrEmpty()][string]$sqlServerHost,
  [Parameter(Mandatory)][ValidateNotNullOrEmpty()][string]$databaseName
)

$ErrorActionPreference = "Stop"

# The calculation of the SID manually has been chosen after the AD integrated user lookup didn't work
function ConvertTo-Sid {
    param (
        [string]$ApplicationId
    )
    [guid]$guid = [System.Guid]::Parse($ApplicationId)
    foreach ($byte in $guid.ToByteArray()) {
        $byteGuid += [System.String]::Format("{0:X2}", $byte)
    }
    return "0x" + $byteGuid
}

$applicationId = (Get-AzADServicePrincipal -DisplayName $managedIdentityName).AppId

Write-Host "For identity name $managedIdentityName belongs $applicationId as application id"

$sid = ConvertTo-Sid -ApplicationId $applicationId

$ddlstmt = "
IF NOT EXISTS(SELECT 1 FROM sys.database_principals WHERE name ='$managedIdentityName')
BEGIN
  CREATE USER [$managedIdentityName] WITH DEFAULT_SCHEMA=[dbo], SID = $sid, TYPE = E;
END
IF IS_ROLEMEMBER('db_owner','$managedIdentityName') = 0
BEGIN
  ALTER ROLE db_owner ADD MEMBER [$managedIdentityName]
END
"

Write-Host "Get an access token for managed identities for Azure resources"
$access_token = (Get-AzAccessToken -ResourceUrl 'https://database.windows.net').Token

Write-Host "Create SQL connection string"
$conn = New-Object System.Data.SqlClient.SQLConnection
$conn.ConnectionString = "Data Source=$sqlServerHost;Initial Catalog=$databaseName;Connect Timeout=30"
$conn.AccessToken = $access_token

Write-host "Connect to database $databaseName"
$conn.Open()

Write-host "SQL DDL command to be executed" $ddlstmt
$command = New-Object -TypeName System.Data.SqlClient.SqlCommand($ddlstmt, $conn)

Write-host "Executing command"
$command.ExecuteNonQuery()

Write-host "Close connection"
$conn.Close()
The last important step is to execute the above PowerShell under the identity which is also administrator of the SQL Server. What worked for me is to create a Service Principal to assign this role and to store its credentials in an Azure DevOps Service Connection. This way you can create a pipeline in Azure DevOps with the AzurePowershell Task that can run the above PowerShell using the service connection:
- task: AzurePowerShell@5
  displayName: Configure database access
  inputs:
    azureSubscription: 'AzureServiceConnection'
    scriptPath: Scripts/configureDatabaseAccess.ps1
    scriptArguments: >-
      -managedIdentityName 'MyManagedIdentity'
      -SQLServerHost blog-dbserver.database.windows.net
      -DatabaseName 'BlogDb'
    pwsh: true
    azurePowerShellVersion: latestVersion
The end result is a registered managed identity in SQL Server:
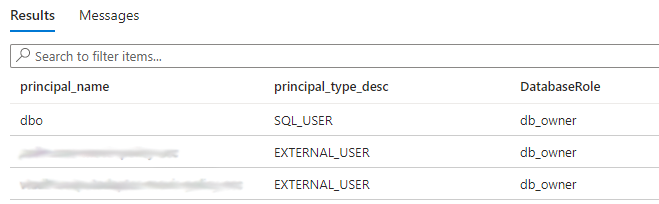
In this example two external users have been added, which are Managed Identities registered in Azure AD.
Connecting to the database
On the application side, things now got simpler. There are only two things needed:
- The managed identity registered in the SQL database needs to be associated with the App Service
- The connection string should mention to only use Azure AD without credentials to connect to the database.
The managed identity can be easily associated with the App Service by either the Azure Portal or by configuring the following Bicep:
resource managedIdentity 'Microsoft.ManagedIdentity/userAssignedIdentities@2022-01-31-preview' existing = {
  name: 'myManagedIdentity'
}

resource appService 'Microsoft.Web/sites@2021-03-01' = {
  name: appServiceName
  location: location
  properties: {
    // ...
  }
  identity: {
    type: 'UserAssigned'
    userAssignedIdentities: {
      '${managedIdentity.id}': {}
    }
  }
}
The connection string of the App Service should look like this:
Server=tcp:dbserver.database.windows.net,1433;Initial Catalog=BlogDb;User Id=GUID-OF-MANAGED-IDENTITY;Authentication=Active Directory Managed Identity;
Now your app service should be able to retrieve an Azure AD access token by itself and make itself known to the SQL Server instance.
Conclusion
In the end, I’m very satisfied that it is possible to use a Managed Identity also for SQL Server integration. One less secret to worry about in either Key Vault or the App settings of the application. What struck me during the implementation is the amount of disclaimers, warnings and not always obvious instructions in the Microsoft documentation. It still doesn’t feel mature enough to qualify it as ‘Plug ‘n Play’. I’m glad I’ve got both approaches working in order to get the project I was working on moving.
Because other blog posts on this topic are in my view not in-depth enough, I had the urge to write this article to help others struggling with this. I hope this will help!
References
- Configure Azure Active Directory authentication – Azure SQL Database & SQL Managed Instance & Azure Synapse Analytics
- CREATE USER (Transact-SQL) – SQL Server
- Managed identity in Azure AD for Azure SQL
- Connect to Azure SQL with Azure AD authentication and SqlClient
- AzurePowerShell@5 – Azure PowerShell v5 task